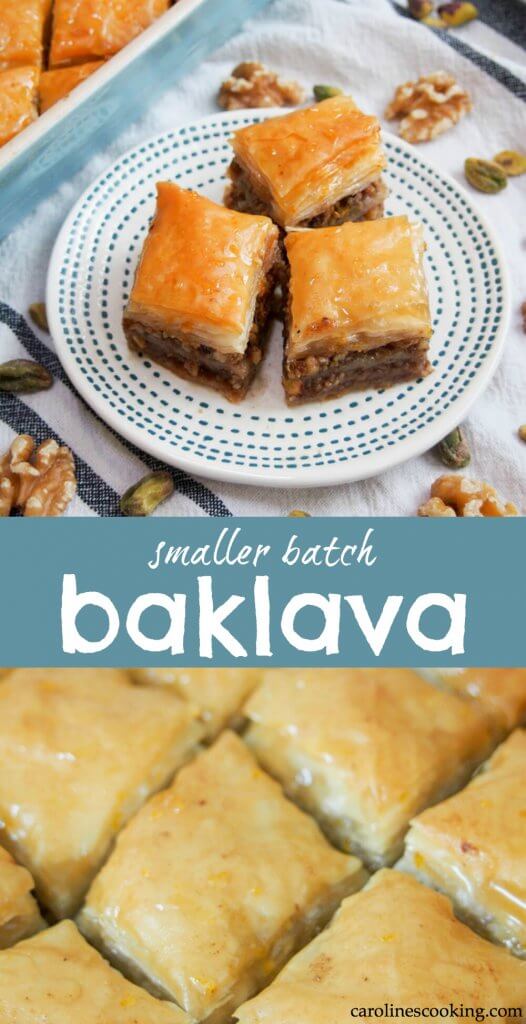
Baklava is such a classic sweet treat enjoyed in Greece, Turkey and across the broader Eastern Med. The combination of sticky, crisp pastry and nuts is addictively good! This baklava recipe will guide you through making a smaller batch, perfect for when you don't need a huge quantity.

This post may contain affiliate links, where we earn from qualifying purchases. See more details in the policy page.
I was lucky enough to travel a reasonable amount when I was a child and we had a few trips to different Greek islands and Cyprus. While I don't remember everything, I do remember lovely beaches, exploring ancient ruins and some delicious food.
Many of the region's dishes have become family favorites, which my kids have grown to love as well, like moussaka and lamb kofte. And I still definitely have a soft spot for baklava.

Where is baklava from?
Baklava is believed to be Turkish in origin then spread around the region during the Ottoman empire. It's origins go back incredibly far, believed to be Byzantine or possibly earlier.
These days, it has been adopted by many other countries in the region including Greece, Cyprus and Israel. (I found this article telling more about the history and variations.)
You'll also find variations on the theme, such as with the pastry rolled around the filling. Most times you hear "baklava" it means this style of layered filo pastry with nut filling, dripping with honey syrup.

What nuts should you use?
The nut filling is where you will see the most variation between the different kinds. Typically, Greek versions tend to use walnuts as the base while Turkish baklava uses pistachios.
Here, I have used a blend of the two although predominantly walnut. I do love both, and find the pistachio takes the edge off the walnut flavor which can be a little too much on its own.
Feel free to use the blend I suggest, adjust to be more or less one or the other, or even use other nuts (though it would be less traditional). Just keep to around the same overall volume.

Smaller batch baklava
There's no getting away from it, baklava takes a bit of time to make. And most recipes make a huge batch since if you are going to be putting in that kind of effort layering up the pastry, you are almost as well to make a decent amount.
Here, I have compromised a bit as personally, much as I love this, I rarely need a huge quantity. I found one of my dishes was the perfect size for a quarter piece of a filo/phyllo pastry sheet and so that led to this smaller batch baklava recipe.
It's still a good number of pieces, as you'll see, but if you have a smaller family and aren't entertaining a crowd, it's much more manageable to get through.

Tips for making baklava
While this takes a bit of time to make, it's really not that difficult and you son get in the swing of brushing layers and stacking them up. A few things to keep in mind, though, to help it work out well:
- Prepare your filling ahead of time so that it's ready to use when you need it.
- Make sure your pastry is fully defrosted before you use it - defrost overnight in the fridge for best results.
- Keep the pastry you are not using covered until you need it. Phyllo pastry dries very easily and becomes brittle and crumbly, making it harder to handle.
- Don't waste any broken or cut pieces - you can easily make the odd layer with any pieces you cut off or that break, it will be just fine. Just make sure the last couple layers are intact sheets to look neater on top.
- If your pastry is slightly short of the dish, fill the gap with foil (see picture above)
- Cut the baklava before you bake it. Believe me, it's SO much easier this way.
- Make the syrup while the baklava bakes, so that it's ready to pour over when it comes out the oven.
- Pour the syrup on while the baklava is still hot. Then leave it to cool completely before taking slices out. This way, all that tasty flavor will soak in.

Some final pointers...
When you pour the syrup over the baklava, it will sizzle and may spit slightly, so be careful. Make sure you pour it over evenly so that each piece is able to get some of the delicious syrup, as it is unlikely to spread from below.
I know, the smell and general temptation of the cooked dish is pretty hard to resist, but it really is best to wait. For one, the syrup will soak in better and more evenly, but also it's easier to take out of the dish without falling apart if you let it cool first.
Make sure you use a thin, sharp knife to cut through the layers properly before you take the slices out, in case they are joined at all.

How to store baklava
This tasty treat will keep well stored at room temperature in an airtight container. It should be good for a week or more, if you give it a chance to last that long. The layers of pastry will soften over time, so it is better within the first day or two.
Baklava is a classic mediterranean treat that's popular for good reason. Yes, it takes a little time, but this baklava recipe is easier than you might think. And believe me, everyone will be impressed and so glad you gave it a try!

Try these other delicious treats with nuts:
- Turron de jijona (Spanish soft nougat)
- Persian walnut cookies (nan-e gerdui)
- Date walnut palmiers
- Plus get more snack recipes, both sweet and savory, in the archives.
You might find this helpful...
I used this rectangular baking dish for this recipe which was a great fit.
See some of my favorite cooking tools and ingredients in the Caroline's Cooking Amazon store.

Baklava recipe
Ingredients
- 8 oz filo pastry (8oz is about 10 sheets)
- 6 oz walnuts
- 2 oz pistachios
- 2 tablespoon sugar (white or brown is OK, but a finer grain is better)
- 1 teaspoon cinnamon
- 1 teaspoon ground cloves
- 4 oz butter
For the syrup
- ½ cup water
- ½ cup sugar
- ¼ cup honey (¼cup is 4tbsp)
- 1 tablespoon lemon juice
- ½ orange zest (ie from ½ orange, removed after)
- 3 cloves (whole, removed after)
Instructions
- If the pastry is frozen, defrost it overnight in the fridge, in the original packaging.
- First prepare the filling by finely chopping the walnuts and pistachios, then mixing both together with the sugar, cinnamon and cloves. While it takes a bit of time, you are best to chop the nuts by hand as the pistachios in particular don't really cut properly in a food processor. You also don't want them as fine as breadcrumbs, just small pieces. Divide the nut filling into 3 small dishes for ease later.
- Have a pastry brush and baking dish ready - I used a 10.5x7in (26x18cm) dish, about 1 ½in/7cm deep in the inside. Cut one piece of filo pastry into quarters (giving you 4 pieces with the long edge the same as the original) and test a piece in the dish. If it is a little short, as mine was, have some foil ready to fill the gap later and build slightly to one side. If the pastry is too big then see if you have another dish that better fits or be ready to trim the pastry as you go (but be aware it takes a little longer).
- If you prefer, you can get all the pastry ready by cutting 10 sheets into quarters, but be aware you need to keep them covered until needed or they will become dry and brittle. Alternatively, keep the pastry in the original wrapping and cut a sheet as needed. If you need to trim the pastry, then you can use trimmings to make a layer now and then, just not the first layer after adding nuts nor on the to.
- Melt the butter (either in the microwave in 30 second intervals, or on the stove in a small pan). Be aware you may need to melt it again as you go, since it is likely to harden while you are building the baklava.
- Lightly brush the baking dish with butter then place one piece of the filo pastry in the bottom in a single layer. Working quickly, and keeping any pastry you are not using either in the original wrapping or under a damp cloth, brush the pastry in the dish lightly with butter then add another layer on top. Repeat until you have 10 layers of pastry in the dish.
- Next, add one of the dishes with the nut filling (ie ⅓ of the total) and spread over the pastry.
- Add another layer of pastry, brush with butter, then repeat adding additional layers. The first layer after the nut filling is always a little tricky to brush so make sure it is one that is not brittle and hold it slightly on one edge as you brush. Once again, add 10 layers.
- Around this point, preheat the oven to 350F/175C.
- After the 2nd 10 layers of pastry, add another layer of nuts, then another 10 layers of pastry, layer of nuts, and a final layer of pastry. In total, you will have 4 sets of 10 sheets of pastry, with 3 layers of nut filling in between.
- Once you have finished building the baklava, brush the top with butter. If you have a gap at the edge of your dish, fill this with crunched up foil. Score the baklava before cooking, cutting at least the top layer of pastry, but in to lower levels is fine too (and I find it better). Traditionally, this is in diamond shapes, but you can also cut small squares/rectangles.
- Bake uncovered for approximately 45 minutes, or up to 60 minutes, until it is golden on top.
- While the baklava is baking, prepare the syrup. Place the water, sugar, honey, orange zest and cloves in a small pan and warm gently over a medium-low heat. Stir so that everything dissolves and mixes. Once it comes to a boil, simmer for a couple minutes then set aside. Remove the orange zest and cloves and stir in the lemon juice before using.
- Once the baklava is golden on top and the layers of pastry appear cooked, remove from oven and pour over the syrup while it is still hot. Do this carefully as it may sputter, and try to spread the syrup evenly over the baklava. Leave it to cool completely before cutting. Cut on the markings you made previously all the way down and removing stacks of pastry and nuts.
Notes
Nutrition
Remember to pin for later!

Mar
Step 6 says zero layers of pastry? Should it be 10 or …?
Caroline's Cooking
Not quite sure what had happened there, but updated - it should read 10! Thanks for the spot.
Malaak
My youngest sibling says they look gross. I told her wait till she tries it 😎.
Malaak
I love baklava it's soo tasty i cant even resist it's smell, it's look and the taste i love it so much thank you Caroline!
Malaak
This looks so good i tasted this when i was like 5 years old i loved it so much. Thanks for the recipe Caroline i love baklava ♥️😊
Caroline's Cooking
Thanks, I hope you enjoy this recipe - it's certainly a favorite here too.
Janet McKaren
I have tried lots of baklavas and this is my favourite recipe. I usually make it during springtime just like this year. My family are going crazy over this recipe and want me to make it again.
Thanks for the recipe,
Janet
Bob
Oops. Not “the rear!” I meant to write “the rest!” 🙂
Bob
Some nice ideas there. Despite all the “mythology” about syrup temperature vs baklava temperature, as long as the baklava is well cooked all the way through, pouring hot syrup on hot baklava will work the best.
Also the note about using ripped phyllo is spot-on. When cooks in Turkey roll their own phyllo (it really is worth it!) they cut the perfect top sheets first, all together, and roll them around another pin separately to lay over the top at the end. The main body of the baklava is composed of all the edges of the sheets.
Here are a couple hints to make this easier; though the last one is an extra step it will make things look nicer.
Instead of brushing on the butter, only brush the pan. The rear can be sprinkled with a brush. As you build it, sprinkle in between ever 5-6 layers. You’ll see why in a second. This way there’s no danger of marring sheets. It’s best to sprinkle between the very top sheets but you don’t really have to; you can just lay them on.
After the baklava is assembled, make all the cuts in one direction, then pour the melted butter over the top and along the cuts. (The butter will get everywhere it needs to be.) Let the butter cool and set up a little, THEN make the cross-cuts. This will hold everything together and keep the sheets from slipping around.
And last - use clarified butter. This will eliminate any spotting because of bits of milk solids.
And a last note - don’t brown it too much. Baklava always looks darker after they syrup goes on; err on the side of slightly light but well cooked all the way through!
Caroline's Cooking
Appreciate your suggestions - I've never tended to have a problem brushing in the dish, particularly with a smaller size like this, but I can see how the cutting then adding butter may help with a large quantity.
Calleigh
This recipe is simpler that I thought.. I love the perfectly flaky phyllo dough with my favorite nut mixtures like walnuts and pistachios, then finished with homemade honey syrup. Delicious!!
Caroline's Cooking
Thanks, indeed baklava does take a little time making the layers but it's not actually that difficult!
Beth
That is so fun that you were able to travel and bring back tasty recipes like this one. I love that this is a smaller batch just for me!
Caroline's Cooking
It's a good excuse to try lots of things while traveling 🙂 And yes, I do find a small batch useful and glad it's useful for others too.